To allow customers to view your products in AR please follow steps:
- Step 1: Install the 3D Warehouse app
- Step 2: Get 3D models of your products
- Step 3: Add a 3D model to the 3D Warehouse app
Step 1: Install the 3D Warehouse app
You can install the 3D Warehouse app using the sign-up page.
Steps:
- Open the sign-up page.
- Enter your
myshopify.comstore domain. - Click Install
- Review the details, then click Install app
You can access the 3D Warehouse app on the Apps page of your Shopifyadmin.
Step 2: Get 3D models of your products
Product photos
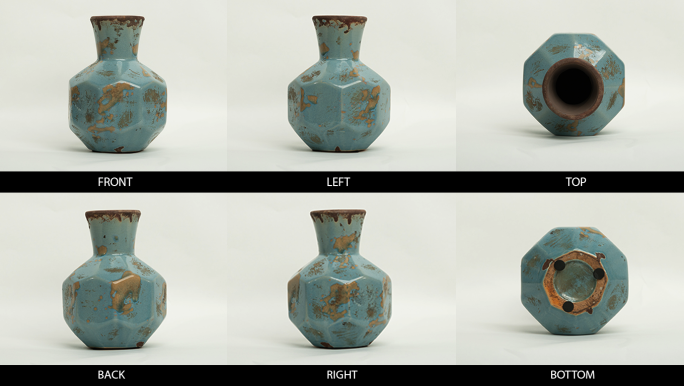
3D models are created using photos. To create the 3D model, the Shopify Expert needs photos of your products from multiple angles:

When taking photos of your product, follow these guidelines:
- Make sure that your product is well lit.
- Make sure that your whole product is in focus.
- If possible, don't use a cellphone camera. For large products like furniture, use a camera with a 50mm lens. For small to medium size products, use a 70mm or 100mm lens.
- Take extra photos of any unique details or textures.
- Give the photo files clear titles like
blue vase - top, orblue vase - leftand store them in a clearly labelled folder.
Product dimensions
To create accurate 3D models, the Shopify Expert needs detailed measurements of your product. When providing measurements, follow these guidelines:
- Describe each dimension of your product in clear, simple terms.
- Provide the measurements in
mm. - Include a diagram to show which dimensions the measurements correspond to.
- If you have technical drawings or CAD files associated with your product, include those as well.
Naomi gives the expert a measurement diagram with corresponding product dimensions in millimeters:

- The height of the vase (1) is ____mm
- The top of the vase to the bottom of the neck (2) is ____mm
- The bottom of the neck to the bottom of the vase (3) is ____mm
- The diameter of the mouth of the vase (4) is ____mm
- The width of the lip of the mouth (5) is ____mm
- The diameter of the bottom of the neck (6) is ____mm
- There are 8 hexagonal faces on the vase
- The height of the hexagonal faces (8) are ____mm
- The width of the hexagonal faces (9) are ____mm
- The diameter of the widest part of the vase (10) is ____mm
- The diameter of the bottom of the vase (11) is ____mm
- The diameter of the foam feet are ____mm
The Shopify Expert uses these photos and dimensions to create a 3D model of the blue vase. The expert sends Naomi a.glband a.usdzfile for her to add to the 3D Warehouse app.
You may hire expert following:
- From your Shopify admin, click your account menu, then click Hire a Shopify expert:
- Click to expand the New functionality section.
- Click Create 3D models of your products for augmented reality (starting at $100 USD).
- Respond to the required questions. If you want to provide product photos and product dimensions now, then make sure you follow the linked guidelines.
- Click Send job.
When you submit a job request, you are not committing to hire a Shopify Expert. This step only submits a description of your project to available experts, who will then review your request. If an expert decides to work with you, then they will contact you with more information about their fees and how to start the process.
If you haven't provided product photos and product dimensionsalready as part of your job request, then the expert will request them from you. Follow the specifications below when taking photos and measurements.
Step 3: Add a 3D model to the 3D Warehouse app
Once you have the 3D Warehouse app installed and have sourced a 3D model, you need to add the model to the 3D Warehouse app.
Steps:
- From your Shopify admin, click Apps.
- Click 3D Warehouse.
- Click Add 3D Model.
- In the Title field, enter a title for the 3D model.
- In the Linked Product field, select the product and variant that this 3D model is associated with, then click Select product.
- Click Upload File and select the
.usdzfile provided by the Shopify Expert or your designer. - Click Save.
Repeat the upload process for the.gltfor.glbfile that your Shopify Expert provided. Make sure you link it to the same product so that you have both 3D model file types associated with the product.
Note
If you upload a.gltffile, you'll be prompted to add additional files in the Linked Files section. Click Upload File to upload the linked texture resources provided by your expert.
Accepted file types
.usdzfile and a.gltf/.glbfile. These different file types are used by different platforms and features.
The best way to make sure that your online store will be compatible with future augmented reality and 3D features is to upload _both _file types.